Adding Facts and Sources to Your Tree
To add a fact or a source to your tree, go to the profile page of the person you would like to update. In the timeline section, you can add a new life event by clicking the + icon at the top right of the section.
You can also add a new source for an existing life event: click on the title of the event to expand, and click "+ Add supporting evidence" at the bottom of the section.
When you add a fact or a source, a dialogue box with five sections will appear. American AncesTREES will guide you through the process of adding all of the information.
1. Type
On the first screen, select your event type. "Vital Events" are common types of major life events, such as Birth, Marriage, and Death. "Other Events / Facts" are less common categories of events, including an "Other" space in which you can write your own. You can also choose "Nonspecific source" if you are adding a source that provides many kinds of information or stories rather than a specific fact, like a family history book.
Click "Next" to move on to the next section.
2. Details
Add the date and place where the item was created or the event occurred.
Note: the list of places (and jurisdiction levels) comes from the WeRelate Place Wiki http://www.werelate.org/wiki/Special:Search/Place. Please feel free to contribute additional locations, suggestions, or corrections there. It's an open community dedicated to helping genealogists around the world.
You can add additional specifications about the fact in the "Fact Details" field. For example, if you selected "Occupation" in the previous section, you could add the specific occupation such as Farmer, Teacher, etc.
In the "Place Details" area, you can add additional information about the location such as the specific name of the cemetery for a burial, the church name for a marriage, or the civil office where the document was issued.
In the "MEDIA" section, you can add as many images to the file as needed using one of these three methods:
-
Click "Select File" and choose a file from your computer's file browser.
-
Open your computer's file browser and drag a file onto the square.
-
Copy an image found online or in a document to your clipboard. Paste it into the square by clicking on the square and typing "CTRL + V" on your keyboard.
In the "Notes / Comments / Transcription" area, add any additional information you would like. A set of text editing tools will appear when you click on the section, so that you can style your notes however you would like.
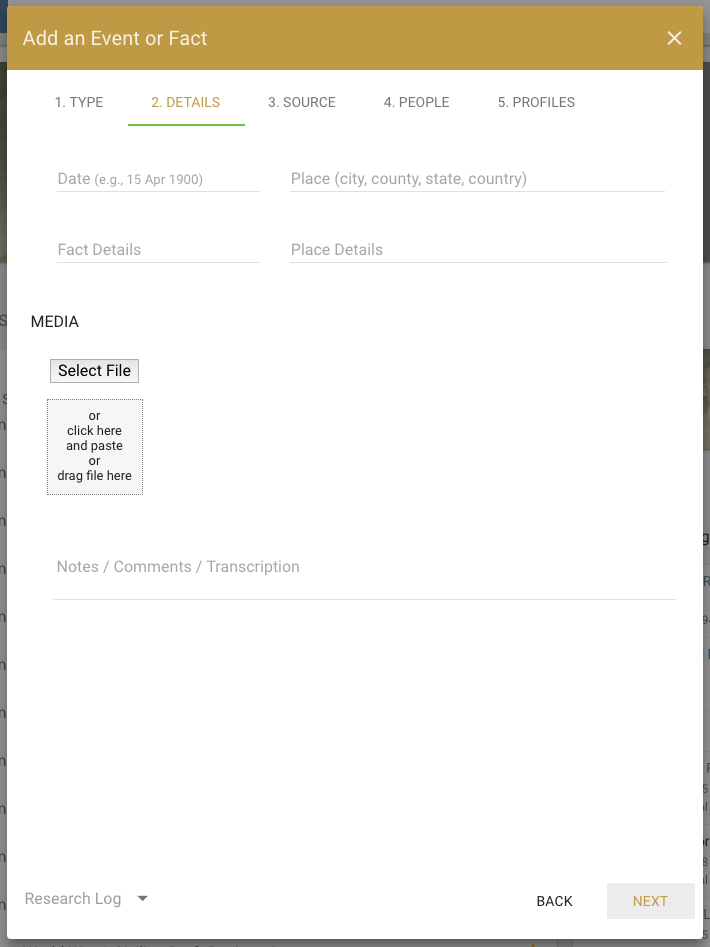
Click "Next" to move on to the next section.
3. Source
As you enter information in the source fields, AncesTREES will create a citation for your record. You can use this citation or replace it with your own custom citation. None of the fields are required. You can copy and paste a citation directly into the Citation field if you choose.
If you would like AncesTREES to create the citation for you:
- Add the author name and title, collection name, etc. in the Source field. If your source has been added to the WeRelate Wiki it will appear in the drop down menu of sources.(See the source section of WeRelate for more information about sources cataloged there.)
- If the item came from an online source, add the URL where your document can be found. Even if your source has been cataloged at WeRelate, you should include a specific URL pointing directly to your document if possible, so that AncesTREES can generate a thumbnail and hyperlink which will allow you to jump back to your source from within the timeline.
- Add the page number(s) or image number(s) within the collection.
- If the item you're adding came from an online source, add the date on which you accessed the image.
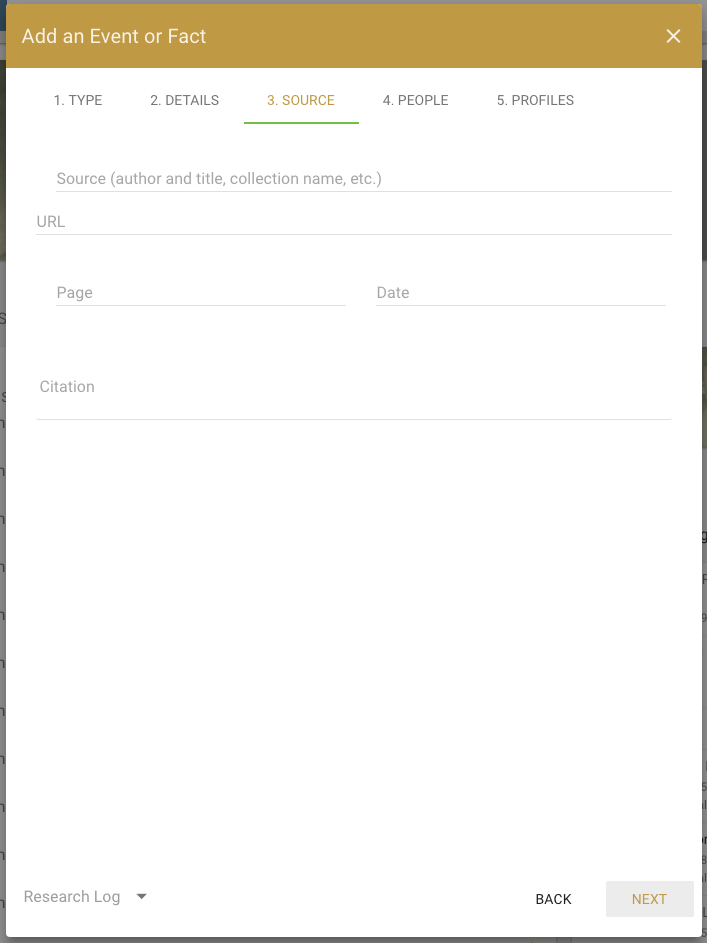
Click "Next" to move on to the next section.
4. People
This section will guide you through entering all of the information from your item. Use the "+ Add More People" button to add each person listed on the record in question.
The first "Person's name" field will be automatically populated with the person whose timeline you are working on. If you need to enter a name manually, begin typing the name in this field and select the person from the drop-down menu that appears.
For each person, you will need to enter their name in the "Name on Record" section. If the name on the record is identical to the name of the person in your tree, you can click the hooked arrow symbol to copy the name into the fields. If not, you can type the name manually.
When adding additional people, you can define their relationship to previously tagged people. In the "Relation" field to the left of the "Person's name" field, use the drop-down menu to choose the family relationship, and use the field after "of" to choose the name of a previously tagged person.
If you need to add additional facts about a person, click "+ Add facts about this person from the record" under that person's section on the page. In the fields that appear you can choose the type of information, add a date and place, and enter any additional fact details you want to include. You can add an unlimited number of facts for each person.
Repeat these steps until you are satisfied that all information from the record has been represented. Click "Next" to move on to the next section.
5. Profiles
In this final section, you can update the facts you want displayed at the top of each tagged person's profile page. This option will only appear if the facts in the record you are adding contradict existing facts—if not, the space under the person's name will say "Nothing to update." If you do want to update a fact, click the "Update profile" switch under the person's name.
Remember to click "Save" to finish adding the record.


